Friday, April 19, 2013

Poses


Tall:

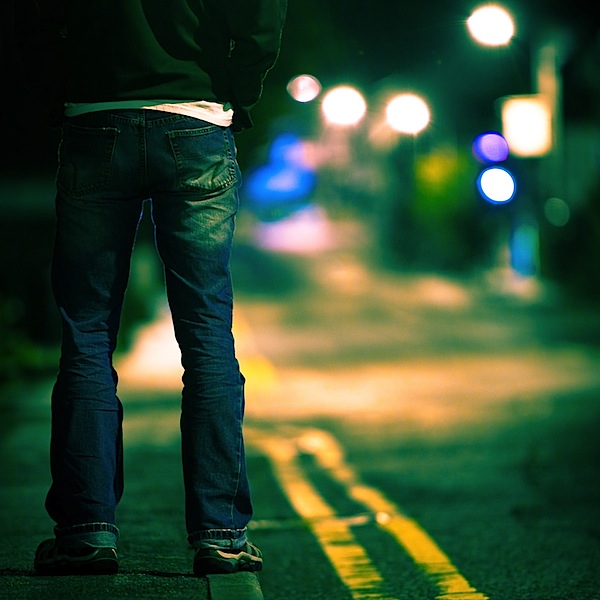
    1. I was in the court yard area when i took this image.
    2. One problem i had was figuring out how to make my model look tall.
    3. This image is one of my best because it clearly gives the illusion.
    4. One thing that could be improved in this picture is how bright the background is.

1. i was in the middle court yard are when i took this image.
2.  The problem i had prior to taking this image was finding a good location where i could apply the "tall" technique and would have a good spot to step back and make my model look tall.
3. This image stands out as one of my best because of all that i took for this particular pose, it is the one that fits the best and the model's face and position emphasizes the pose itself.
4. One thing that could be improved in this picture is again the over-exposed background that looks washed out and takes some of the attention away from the main focal point, the model.

Sitting: 

    1. I was on the right side of the middle courtyard of the school when I took this picture.
    2. One problem i had with this image was being able to capture the model without having distracting objects in the background, like the trash cans for example.
    3. This image was one of my best because the objective is clear and the expression and position of the model exemplifies precisely sitting as a pose.
    4. In this picture, one thing that could be improved is cropping it or deleting the inclusion of the trash cans through photoshop so it does not serve the purpose of being a distraction.


    1. I was in the courtyard of the school when I took this picture along with the other ones.
    2. Another problem i faced prior to take this image was finding a spot that was just right where the lighting would not hit the model too harshly.
    3. This image serves as one of my best because through the expression on his face and the position of his body, you really get the sense that he is simply sitting, looking away, and in deep concentration overall.
    4. What could be improved in this picture is adjusting the iso so that the background is not so bright compared to everything else in the image.

    Standing:


    1. When taking this image, i was by the student store for this particular shot.
    2. A problem I faced prior to taking this shot, was having enough space to back up and take this image without entirely cutting off a part of his body in the process- in the image.
    3. I consider this one of my best for this pose because I really like the background which produces leading lines and how my model really stands out because there are no distracting objects behind or near him.
    4. One thing that could be improved is instead of taking the image in landscape mode, having it taken in portrait so my model would be seen from head to toe - leaving no cut off ligaments.


    1. I was by the tree near the right side of the student store when I took this image.
    2. Prior to taking this image, I faced the problem of the sun being much too bright for my model to look towards and therefore, come out squinting his eyes because of it.
    3. This image is one of my best because by giving my model a dark background to lean on, the background is not too washed out or bright and my model looks the part.
    4.One thing that I would improve in this picture is maybe shifting more to the left or right so that he is not right dab in the middle and to give it a more mysterious aspect.


    Wild Card:


    1. I was to the right side of the student store when I took this picture.
    2. One problem i faced prior to taking this image was positioning myself in such a way that would not capture two different backgrounds and add too many distracting objects to the image.
    3. This image is one of my best because it captivates my model's prop the best, without any unnecessary objects in the back. Also, it was taken to the left which adds an extra element to it.
    4. One improvement that could be made to this photo is either straightening it up in photoshop so that it does not look slanted or simply using the tripod to take it straight on.


    1. I was by the 200 building at the tree near the student store when I took this image. 
    2. Prior to taking this image, a problem I encountered was the shadows of the tree itself that reflected on my model's face.
    3. This picture is one of my best and stands out from the others that I took because it displays more creativity from both my model and I and adds another element or fun factor that the others do not exhibit.
    4. An improvement that could be made to this image is 1, not cropping off his foot when taking the image, and 2, getting rid of the shadows on my model's face.

    1. The most challenging element of this assignment was attempting to find the different locations and lighting that would best represent the pose I was trying to portray. Some were too bright or was attempted at a location that did not offer many options or versitality. I overcame these challenges by using a difference in iso to my advantage and finding the best spots for each particular pose that offered the best lighting or simply fixed it in photoshop.
    2. My photography skills have changed immensely since September due to the simple fact that i now know how to use different techniques that back then, would have seemed nearly impossible to me. For example, i now know how to adjust my settings if the brightness is to high with the iso or how to get a full-stop motion photo by changing the shutter speed. Simple things like that really come in handy and are good things to know for a photographer. I am also more confident in how to take great depth of field images that give the intended blur effect- which is my favorite technique out of all of them.
    3. Before the year ends, I would like to just go over techniques that i did not quite grasp like capturing a motion within a photo while keeping the object in sharp focus, but blurring to motion so it gives off that intended effect. I think if I go over it well enough, i could be able to then use it to my advantage and would understand better how and when to use it to create the effects that i desire for my images.

Thursday, April 18, 2013

Float


1. Here I was trying to tell the story of a skater going for their usual tricks in the air. My inspiration was marshall arts artist who portray the same thing by simply jumping in the air and creating a powerful image.
2. The technical challenge i faced was finding the correct lighting that would allow Eric to be the main focal point of the image, not the brightness in the back. I resolved it by picking different locations, changing the iso, and using some photoshop techniques.
3. An artist challenge i faced was finding a good location that would give off the idea i wanted it to. I overcame this by being versitile and just looking for it.


 1. In this image, i was trying to tell the story of a Chris Angel-like element of magic and almost holy features. My inspiration was the way in which people portray the illusion of magic.
2. One technical challenge i faced was fixing and editing the shadow to make it look more realistic. I overcame this challenge by applying new techniques and adding a mask that worked in my favor.
3. One artist challenge i faced was coming up with a good idea for which my model to go along with. I overcame this by simply focusing on finding a good location and then letting my model's creativity go along with it.


1. This image is telling the story of a risk-taker boy who is  attempting a stunt of jumping over his two friends.
2. One technical challenge i faces was the lighting- it was exposing the grass all nice and bright but no the faces. I did try changing my iso and overcame this challenge by rearranging my position and placement.
3. An artist challenge i faced was what story i wanted to tell through motion. To overcome this challenge i pretty much stopped over-thinking it and just take an exciting image,

Tuesday, February 26, 2013

Vermeer


 1. Some of the challenges i encountered were with lighting and figuring exactly which spots made the best ones for portraits to emphasize the face expressions. Some spots were just too bright while others hid the face rather than making it the main focal point. Apart from this, shadows were another area which negatively affected the outcome of my photos. For example, in some instances the trees would cast a shadow on either Jose or Nick- covering half of their faces. It all related back to finding a good spot to photograph the portraits.
2. There were also many challenges to being a model besides apart from being the photographer. For instance, as the model, it was important to give the expressions that the photographer wanted to portray in their pictures - even though at times, this was not always clear. In addition, being the model meant having to be versatile and make a good focal point when out in front of the camera. This was not always the easiest thing to do because the model is constantly being told to go somewhere else or turn a certain way and it is their job to listen.
3. Being a good model consists of being flexible in emotion and not too stubborn or shy in front of the camera. The model must know which role to play in which different types of situations. No matter how uncomfortable you might feel, it is their job not to portray that in the image. The model reflects the photographer's work, so they have pressure on their shoulder to add an amazing element to the central image. In contrast, as the photographer, you must know what makes up a good picture and what makes up a not-so-good image as well. They must try and try again until they have found the direction in which they want their images to flow. They must know how to capture everything precisely and in the better light so that the model is not lost or discontent with the image. The model exhibits an immensely important role, but the photographer has most likely the bigger one to play.

Wednesday, January 30, 2013

Photo Analysis: Portraits


1. In this picture is what seems to be a young bride looking away in a museum or perhaps a church.
2. I see a young, pretty, youthful girl in a wedding dress in a venue that is elegant and classy to match her appearance and the feeling that the image reflects.
3. I infer:
  • it is the day of her weeding and she has arrived at the museum or church to take pictures and is posing in a way that makes it seem as if she is looking into the future, which gives it a very artistic feeling.
  • it is the day of her sweet 16, and a young girl is awaiting for the arrival of her guests to make her first appearance and begin her journey as an upcoming woman
  • she is looking over to her groom who is possibly on the sidelines but wants to make an appearance as an individual ready to embark on their life together.
4. Questions: What is she looking at? Why is she on her own? What is she awaiting? What is below that is so intriguing?


1. In this picture is a young baby sitting down with a charming laugh and smile on his face.
2.  I see a young child with a huge smile upon his face sitting upon a couch reflecting a happy mood and tone to those who see it.
3. I infer:

  • This baby was looking at his parents who were signaling to him and therefore making him laugh.
  • The baby was just enjoying a casual day in his home, surrounded by much love and comfort.
  • Enjoying the company of his caring parents, the baby is enjoying his childhood living a happy life.
4. Why is the baby laughing? Why is he showing such pleasure? Why is he by himself? Who's at the other end of the couch?


1. In this picture is a young woman smoking away.
2. I see a young lady who is gazing at the cigarette in her hand, holding it away as if either admiring it or rejecting it. She is surrounded by empty space, confined within it; just her and the cigarette.
3. I infer:

  • This young woman has been smoking for a while, perhaps since a young age and has made a habit of it that has escalated to an addiction.
  • She has smoked before, but is now re-thinking it and seeing it as what it really is, harmful and deathly.
  • She is an advocate for not smoking and is in darkness to reveal that the harms of it are all there and to shed some light on the truth about it.
4. Why is she staring hardcore at the cigarette in her hand? Why is half of her body in the dark? Is she rejecting or glamorizing smoking?


1. In this picture, is a young soccer athlete in the locker room.
2. I see a female athlete holding her passion in her hand and in solitude inside a locker room.
3. I infer:

  • She is pondering and thinking back to when she struggled being a female soccer player having dealt with much sexism. but is now on the brink of success.
  • She is getting ready to play a soccer game is in deep concentration and getting her head in the game.
  • Soccer is her only escape of the daily pressures of life like being a female soccer player and having to meet up to certain expectations for example.
4. Why is she looking down? Why is she by herself in a big, empty space? Whys is she gripping the soccer ball tightly? Why is she in such an old and rusty place?


1. In this picture is a baby with a mischievious expression on his face.
2. I see a baby laying down with a confused look upon his face reflecting a funny feeling
3. I infer:

  • the baby is angry for not getting what he wants
  • with no way to true way to communicate with his parents, he stares at them in frustration
  • He is staring at his parents acting like little kids in front of him with confusion in his eyes.
4. What is the baby staring at? Why is he putting his hand to his face? What is so puzzling? What action was done just before making that face?


Friday, January 25, 2013

DOF Photo Corrected


1. i enhanced the photo a bit by changing it to a darker level and adjusting its darkness.
2. They enhanced my image by making the background darker to have the main focal point not washed out.
3. i feel good about making these adjustments because they really make the image pop more.
4. I wish i could have darkened the fire hydrant to not get so much sun on it. 

 1. I enhanced this photo by changing the black levels in the image and darkening it.
2. They enhanced my image by making the car seem more crisp and in focus with my color.
3. I feel good about making these adjustments because it brought a new perspective to the image.
4. No, there is nothing else i would like to change in the image.


1. I improved this picture by playing with the color levels to make the background darker and make the main focal point stand out more as well.
2. By making these adjustments, my image has inherited more contrast than it had before and enhances the idea of space between the object and the background.
3. I feel like the adjustments definitely improved my image and makes it not seem so washed out when in comparison to the background.
4. I wish i would have known how to erase the "flash" look that appears on the fire hydrant.


1. I enhanced this image more than the others by shifting the levels to add more white to it and give it a brighter, perfect- clear effect.
2. I feel confident that making these adjustments improved my original image because now Leo does not seem to be washed out with the background or fade along with it due to the color blending.
3. I feel that these adjustments completely turned the image around 360 and added much more needed color.
4. I wish that i could have left Leo as bright but made the background a bit darker.

1. I enhanced this image by darkening the object while also darkening the overexposed background.
2. The adjustments enhanced my image by making the object seem crisper along with its background.
3. I feel that the adjustments i made, made a big difference and made it more appealing to the eye altogether.
4. i wish that i would have known how to darken the two right corners to erase the white it gives off.

1. I enhanced this image just a bit by playing with the gray level and exposing it in soft light.
2. They enhanced my image by making it seem crystal clear, they were subtle but necessary.
3. I feel like although the adjustments are not so bold, they expose the image in new light.
4. No, I feel like i did enough to the image so it does not need more retouching,


1. Shallow depth of field uses a large aperture like f/2.8 while Large depth of field uses a small aperture like f/22. While shallow depth of field creates a blur in the backgrounds, Large depth of field leaves everything in perfect focus.
2. Use TV mode when you want to use a particular shutter speed and use AV mode when you want to utilize a complete depth of field.
How you decide when to use TV mode vs. AV mode?
3. The hardest part of this assignment was knowing exactly where was the best spots to capture the image where the background would make a big contrast and then knowing which adjustments would fix your errors in each picture.


Midterm Portfolio

1. Rule of thirds.
2. This image is the best representation because it places the object to the side and not dead-center to make a bit more interesting and stand out more.
3. One thing that would make this image better is maybe getting a bit closer to add more of an element of a shift and a blur.


1. Filling the frame.
2. This image is the best representation of this technique because it utilizes all of the space within the focal length to ensure that your eye is instantly attracted to the center of the photo, the main focal point.
3. One thing that would make this image stronger is getting at a lower eye-level to get more of a blurred color in the background.


1. Lines
2. I chose this as my best interpretation of this technique because by stepping back and capturing the ceiling as a whole, it makes it seem continuous and also the lines point to the main focal point of the image, the trash cans in the middle.
3. This picture could be improved by either blurring out the background so it does not seem so white and overexposed or using a different setting to capture it.


1. Angles
2. This image is my best representation of angles because it exposes the object at a different angle than you would normally see. By being "clawed" on to the tree, it creates a different view-point.
3. This image would be stronger if i had used a larger aperture because the background is too bright.


1. Patterns
2. This image best represents this technique because it captures the idea of an endless and continuous pattern created by the fence and your eye is automatically forced to follow the pattern.
3. I wish i would have taken a few steps back to really capture the entirety of the gate and give it more of a continuous effect.


1. Framing
2. This photo definitely utilizes the technique of framing by having an object as the center of the image, but surrounding it within tree branches which make it seem as if it was built just to focus around the camera.
3. One thing that would improve this image is not overexposing the background, the sky, and using a larger aperture.


1. ABC's
2. This photo is the best representation because not only can you clearly see the formation of the "J" but by getting closer, it gives it more of a shaping effect.
3. However, this image could be improved by zooming in even more to get rid of the distracting noise and background that takes away from the object itself.


1. Shutter Speed
2. This image is a great representation of changing the shutter speed because it grasps the movement and action of the leaves falling down while still keeping Liz and the leaves in focus.
3. This image could be improved by getting in closer to be able to really see the action occurring and subtract any distractions from the image.


1. Panning
2. This image captures panning because while the vehicle is in motion, it is not blurred to the point that you cannot clearly see what is taking place in the image.
3. I could have improved this image by getting the car a bit more in focus and get the entire vehicle out of being blurred.


1. Depth of Field
2. This image grasps this technique by keeping the doll crisp and in focus but blurring out the unwanted attention of the colorful background.
3. My photo could be improved by zooming in even more to get a full- blur effect on the posters in the background or even change the background itself to add more contrast.


1. Wildcard
2. This image displays depth of field (my favorite technique) by getting in closer to the object and forgetting about what is in the back to avoid your eye from being instantly attracted to it.
3. This image could have been improved by capturing it from a lower eye-level to get more of the darkness of the background and not get so much light color of the sky.


  1. The biggest challenge for me in this class has been mainly timing. At times, i just have not been able to post something when i need to and that would get me behind. The way this challenge can be overcome would be by wisely managing my own time and being aware of everything that we do.
2. My biggest success in this class is putting myself to the test and applying everything that we learn in class when told to do so. This stands out to me because i find it more natural and easier than any subject like math or english. This will help me in second semester as long as i stick with it and continue to have that motivation.
3. I am most interested in learning how to merely perfect my images because it will help me grow as a photographer. I would like to know how to correct my mistakes either by simply taking another image or fixing it in photoshop.
4. Mr. Pedersen can continue to get us engaged in everything that he lectures us about so we actually get a feel of it for ourselves and know how to do take advantage of the techniques he shows us.
5. To improve my experience in this class, i can make sure to focus solely on what it is we are learning and truly pay attention so i know exactly what i am doing once i get out there to take my photographs.


Friday, January 11, 2013

Depth of Field

  1. This photo has a shallow depth of field
  2. The main focal point of this image is the coffee cup
  3. This photo demonstrates shallow depth of field to draw attention to the cup and the hand holding it. 
  4. I think that the authors purpose for doing this was to kind of advertise the coffee in a way and make it stand on its own making a statement and reflecting a certain mood.


  1. This photo has a shallow depth of field
  2. The main focal point of this image is the one flower in the front, the principle one.
  3. This photo utilizes this skill to show more detail of the flower and show how it stands out from the rest but is still so alike.
  4. The photographers purpose was to show a patter of the continuous flowers but make this one seem like the one starting it all.
  1. This photo uses shallow depth of field.
  2. The main focal point of this photo is the man standing with his back towards the camera during the night.
  3. This photo demonstrates this skill because it makes the background look mysterious by blurring it and using rule of thirds to shift the man and put him in focus.
  4. The photographers purpose was most likely to add mystery to the image by making the night look never-ending and putting the man facing away from the camera.

 
  1. This photo exemplifies large depth of field.
  2. The main focal point of this photo is the same flower from the picture above.
  3. This photo demonstrates this skill because instead of blurring and focusing on just one flower, it has all flowers in perfect focus.
  4. the photographers purpose was to show the patter on these flowers by making them look bolder. 


1. This photo is an example of large depth of field.
2. the focal point of this picture is the horizon and the view of the sun setting.
3.this photo demonstrates this skill because everything in the image is in focus and still draws your attention towards teh crispness of it.
4. the photographer's purpose was to capture the image from a different viewpoint and keep it all in focus to make it look flawless in a way.


1. this photo is taken in large depth of field.2. the focal point of this image is the row of the cartoon figures                  3. this photo demonstrates this skill because everything is in focus to allow you to see every aspect of the objects in the figure.


4. the photographer's purpose was to capture the image in such a way that your eye is instantly attracted to the clarity of the objects